"How many pairs of old jeans do you have in your closet?
Everyone from the sewing novice to the fashion guru can appreciate the 99 ingenious projects that will reincarnate your denim has-beens into fashion must-haves. The techniques are simple, the supplies are easy-to-find, and every project takes ninety minutes or less, from start to finish."
Wednesday, December 29, 2010
Book Highlight - 99 Ways to Cut, Sew & Deck Out Your Denim
Monday, November 22, 2010
Book Highlight - Refashioned Bags: Upcycle Anything into High-Style Handbags
"Handbags are the ultimate accessory. Fortunately, you don't need a cookie-cutter designer bag to make a fashion statement. In today's greener, more fiscally responsible world, it makes a lot more sense–and is a lot more fun—to make your own. Whether your closet is already an amalgam of hand-made clothing and remastered mash-ups or you're diving into DIY for the very first time, bags are one of the easiest accessories to make over and require little more than a needle, thread, and everyday items you can find in the closet, garage, attic, or flea market.
That's why the authors of 99 Ways to Cut, Sew, Trim & Tie Your T-Shirt into Something Special show you how to make boutique-ready bags on the cheap. The Blakeney sisters twist and weave, turn inside-out, and reappropriate just about anything and everything to fashion radical accessories with mad style and a message.
In Refashioned Bags, you'll learn how to create carryalls, clutches, laptop bags, totes, and more. And all of them will get a unique look, whether from the use of an old wool sweater, an ex-boyfriend's neckties, extra shower curtains, dad's hand-me-down suit jacket, a quilt, an umbrella, or even a bath mat."
Monday, November 15, 2010
Book Highlight - Sweater Surgery: How to Make New Things with Old Sweaters
"Why repurpose your sweaters? Because you can't buy sweater fabric by the yard. Sweaters get damaged or go out of style but we still love the prints, colors, and textures. You don't have time to knit it from scratch. It's ecologically correct. And most of all--it's fun!
Sweater Surgery shows you how to upcycle all your slightly worn, slightly damaged, or plain old out-of-style sweaters into fabulous new items for your wardrobe and your home. Readers learn how to choose, cut, restitch, felt, and embellish old sweater fabric, transforming it into beautiful handbags, mittens, scarves, hats, hoodies, skirts, jewelry, soft toys, pillows, and more!"
Monday, November 8, 2010
Book Highlight - The Sweater Chop Shop: Sewing One-of-a-kind Creations from Recycled Sweaters
"Recycle, Re-create, Re-enjoy
You don't even need a sewing machine to upcycle old sweaters into new wearables, blankets, pillows, and dolls that are fresh, playful, and utterly captivating.
It's easy as felting the wool, cutting the pieces for your new project, and stitching everything together using simple hand-sewing skills.
Noted designer Crispina ffrench shares her techniques and passion as she introduces you to the beautiful possiblities in old sweaters."
Friday, November 5, 2010
A way cool upcycled wedding dress.
Imagine creating a one-of-a-kind wedding dress of entirely second-hand fabrics. Read all about it at the Offbeat Bride.
Monday, November 1, 2010
Book Highlight - Handmade Home: Simple Ways to Repurpose Old Materials into New Family Treasures
"For many of us, our home is the center of our life. It is the place where our families meet and mingle, where we share our meals and share our dreams. So much more than just a space to live, our homes offer us a place of comfort, nourishment, and love for us and for our children.
In Handmade Home, Amanda Blake Soule, author of The Creative Family and the blog SouleMama.com, offers simple sewing and craft projects for the home that reflect the needs, activities, and personalities of today’s families. As Amanda writes in the introduction, “As a crafter, I’m always looking for the next thing I want to make. As a mama, I’m always looking for the next thing we need—to do, to have, to use—as a family. The coming together of these parts is where the heart of Handmade Home lies.”
Filled with thirty-three projects made by reusing and repurposing materials, all of the items here offer a practical use in the home. From picnic blankets made out of repurposed bed sheets to curtains made out of vintage handkerchiefs, these projects express the sense of making something new out of something old as a way to live a more financially pared-down and simple life; lessen our impact on the earth; connect to the past and preserve a more traditional way of life; and place value on the work of the hands. Also included are projects that children can help with, allowing them to make their own special contribution to the family home. "
Sunday, October 31, 2010
Halloween 2010 Geisha Costume
Here's Kivi's 2010 Halloween costume. Not pictured are the matching trick or treat bag made from remnants, and the other flower ornament in her hair (it's on her other temple).
This year, aside from picking what she was going to be, I chose most of the individual details of her costume. She's currently very big on the color teal/turquoise, so when I saw the fabric, I knew it would be perfect. I told her about it, and she OK'd the choice from my description, so I acquired it the next time I was at JoAnne's with a 50% off coupon. She picked (and paid for) the parasol on her own, and chose which style of flip-flops she wanted (pretty slim pickings this time of year!).

She's wearing Teva flip flops (instead of the elaborate - and tall - wooden sandals that Geisha wear) and the tabi socks are converted from regular socks.
Here are the individual stories about the different parts of her costume:
This year, aside from picking what she was going to be, I chose most of the individual details of her costume. She's currently very big on the color teal/turquoise, so when I saw the fabric, I knew it would be perfect. I told her about it, and she OK'd the choice from my description, so I acquired it the next time I was at JoAnne's with a 50% off coupon. She picked (and paid for) the parasol on her own, and chose which style of flip-flops she wanted (pretty slim pickings this time of year!).
She's wearing Teva flip flops (instead of the elaborate - and tall - wooden sandals that Geisha wear) and the tabi socks are converted from regular socks.
Here are the individual stories about the different parts of her costume:
Saturday, October 30, 2010
Memory Lane: Halloween 2009
Over the summer, we saw the new Star Trek movie, and Kivi turned into a Trekkie over night. That's my girl!

This is the third time I've used that Simplicity pattern (purple queen, and spider witch previously). This time though, I made some major modifications. You know, I think I'm getting the hang of this sewing thing!
First off, I used the sleeves from the boy's knight costume instead of the long flowy sleeves. Next, I bound the neckline in black to simulate a female Starfleet uniform. And finally - I cut it off a little above the knee. The uniform is supposed to be short enough that it barely covers the butt, but Kivi was only 7 1/2 years old. Plenty of time for the sexpot look when she's older. Oh, and did I mention that this is the first time I've worked with a knit? I'm glad the stretched out lettuce edge on the lower hem looks deliberate (and good). Ok... I'm starting to want a serger.
She already had the boots and the black leggings. I bought the black turtle neck. The Starfleet insignia was mine from when I was a kid. I just mounted it on black foam and turned it into a pin.
Kivi wanted to be a Vulcan, but I wouldn't let her dye her hair (sound familiar?). So she's a red-headed half-human Vulcan. The eyebrows turned out great. I used powder and glue stick to cover her real eyebrows, and a brown eyebrow pencil to create the slanted ones.
Creating the holster belt for the communicator and phaser was tough - sewing is an exercise in spacial relations, and that doesn't really come naturally to me.
AND... This is the first year my sewing machine didn't quit on me right after starting the Halloween costume project. Yeah!!
Friday, October 29, 2010
Memory Lane: Halloween 2008
Kivi really kind of designed her Spider Witch costume herself. She knew she wanted to be a witch, and that she wanted to be scary. So then, she found the fabrics and said "we should buy this see-through fabric and put it on top of this shiny fabric." Huh. Can I do that? "Ok, hon, that sounds like fun." (DOH! Not only am I working with a see-through fabric again, but now I'm working with a slithery slippery metallic fabric??? I'm insane).

It was hard to figure out the modifications to the pattern (the same pattern as her purple queen costume from 2 years before) to make a 2-layer costume. I don't mean to brag, but DAMN, Kivi and I make a great team. I think this costume is lovely. And the neighborhood girls have been playing dressup with it ever since. I bought the hat and jewelry at Party City or some place like that.
Oh, and did I mention that my sewing machine went on the blink AGAIN??? It HATED that hot-pink fabric. This time when I took it in to be fixed, I came home with a new sewing machine.
Thursday, October 28, 2010
Memory Lane: Halloween 2007
This time Kivi wanted to be Medusa. I think we had just watched the 1980s era movie Clash of the Titans or something. We looked at artist renditions of Medusa, and she decided to be a beautiful version.

The costume turned out GREAT. The snake hat was an utter pain in the ass. My fingers got so sore poking holes through the plastic snakes so that I could sew them on, that I ended up drilling tiny holes through them with my Dremel. Never again. (Hmmm... is a pattern emerging here?)
This was also the first (and so far only) time that I've made a vintage pattern. This one was from the 1960s, and I got it from someone on eBay. Pattern conventions haven't really changed that much, at least not in the last 40 years. They are still written for people who know what they are doing. At least I knew slightly more this time around.
I got the fabric on clearance for about $2/yard. It's this slithery stretchy costume fabric, and my sewing machine HATED HATED HATED it. I was getting pretty tired of dealing with that temperamental beast. Another trip to the repairman, who made a minor adjustment, and it started working again.
Wednesday, October 27, 2010
Memory Lane: Halloween 2006
This year, Kivi asked to be a queen. We picked a pattern this time: Simplicity 5520. I made the view on the lower right.
This was the first time I'd ever actually followed a pattern on my own (the wrap skirt I made in 7th grade Home Ec doesn't count).
Have you ever actually LOOKED at a pattern envelope and instructions??? They are totally written for someone who actually knows how to sew. It was really, really hard, and I had to read each instruction like 200 times, and wrestle with my mother's 30+ year old Singer Athena 2000 which fritzed out on me (again!). Got it fixed and kept plugging away, and after lots and lots of calls to my mother, I wound up with this:

Not too bad for a beginner! And that see-through sleeve fabric was a PITA to work with. Never again. I did manage to add a set of inner sleeves to keep Kivi warm. I made tubes and sewed them in. Wrong shape, but you can't see the flaws, as they are hidden under the real sleeves. They worked, so can't complain. Got the garland at the RenFest that year.
Tuesday, October 26, 2010
Memory Lane: Halloween 2005
This is the very first Halloween costume that I made for Kivi. Not only did I make it, but I designed it myself! I made a poncho out of white fabric by taking a rectangle, and cutting a hole for Kivi's head. Then I sewed on some ties to hold it closer to her neck. I then made a hood, and sewed TONS of strips of fabric and gauze all over it.

The darned thing was uncomfortable, and probably dangerous for my then-four-year-old. She couldn't see very well with the hood, and we ended up trick-or-treating with the hood off most of the time.
This was the first year that my sewing machine got temperamental on me, and I had to borrow a machine from a friend to finish Kivi's costume.
Monday, October 25, 2010
Book Highlight - Sewing Green
"By its nature, do-it-yourself sewing is environmentally friendly. In Sewing Green, Betz White takes stitching to an even higher level of sustainability, presenting 25 projects made from "repurposed" thrift-store and back-of-the-closet finds and organic fabrics.
White’s whimsical yet practical designs include an apron constructed from men’s dress shirts (and a wallet from the shirts’ cuffs!), a soft blanket pieced from secondhand cashmere sweaters, and even a tote bag refashioned from used Tyvek envelopes. Along the way, White dispenses tips on everything from how to deconstruct old garments for reuse in new creations to how to wrap gifts with resusable fabric scraps instead of paper.
Inspiring profiles about well-known leaders in the eco-stitching movement are sprinkled throughout, and a complete resources section helps crafters make eco-smart choices. With Sewing Green, today’s sewers will be fashioning handmade heirlooms and sustaining traditions for generations to come."
Sunday, October 24, 2010
Kanzashi, anyone?
So, how DOES one make a kanzashi?
You know, a kanzashi. You mean you don't know what a kanzashi is? Huh. Imagine that. You must be from the West.
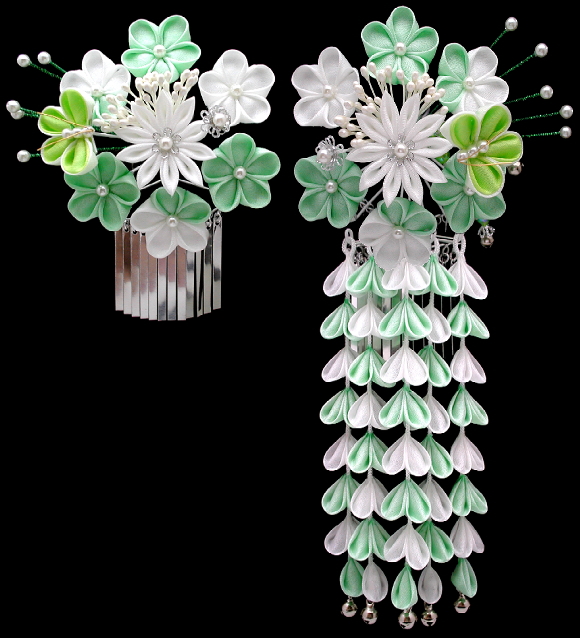
It's one of those dangly hair ornaments that Japanese brides and geisha wear in their hair, usually above one temple, so that the dangly bits gracefully brush their jawline.
They are really quite lovely, actually. Here's an example of a real one:
 Here's what it looks like in action (She's a bride wearing a Japanese wedding kimono):

You know, I think these outfits have a lot more flair, and are much more interesting than most western wedding dresses, and I LOVE the colors. But I digress. These came from this site: Maya Japanese Traditional Arts and Crafts. If you want to see more, there are lots to gaze at.
Now, I can't afford to buy one of the kanzashi on this site. Supporting traditional crafts like this sounds pretty cool. But the prices are pretty expensive, ($120 to $185 for the ones I looked at), and I'm not going to spend that for a Halloween costume for a kid.
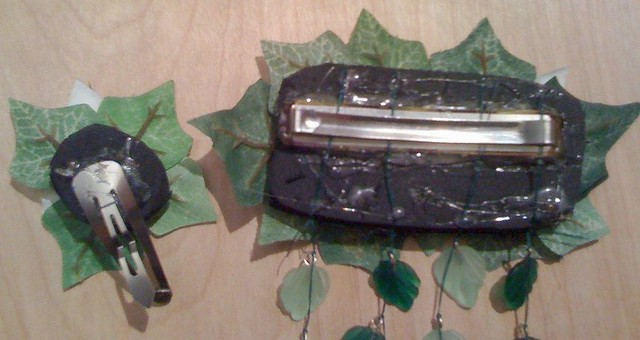
So, I made my own with some old hair clips, barrettes, silk flowers, glass leaf beads, and hot melt glue. Total cost for new materials: about $2 for the flowers. The rest I had on hand.
 And here's the (rather ugly) back, showing the liberal use of glue.
You know, a kanzashi. You mean you don't know what a kanzashi is? Huh. Imagine that. You must be from the West.
It's one of those dangly hair ornaments that Japanese brides and geisha wear in their hair, usually above one temple, so that the dangly bits gracefully brush their jawline.
They are really quite lovely, actually. Here's an example of a real one:
Here's what it looks like in action (She's a bride wearing a Japanese wedding kimono):You know, I think these outfits have a lot more flair, and are much more interesting than most western wedding dresses, and I LOVE the colors. But I digress. These came from this site: Maya Japanese Traditional Arts and Crafts. If you want to see more, there are lots to gaze at.
Now, I can't afford to buy one of the kanzashi on this site. Supporting traditional crafts like this sounds pretty cool. But the prices are pretty expensive, ($120 to $185 for the ones I looked at), and I'm not going to spend that for a Halloween costume for a kid.
So, I made my own with some old hair clips, barrettes, silk flowers, glass leaf beads, and hot melt glue. Total cost for new materials: about $2 for the flowers. The rest I had on hand.
And here's the (rather ugly) back, showing the liberal use of glue.
Saturday, October 23, 2010
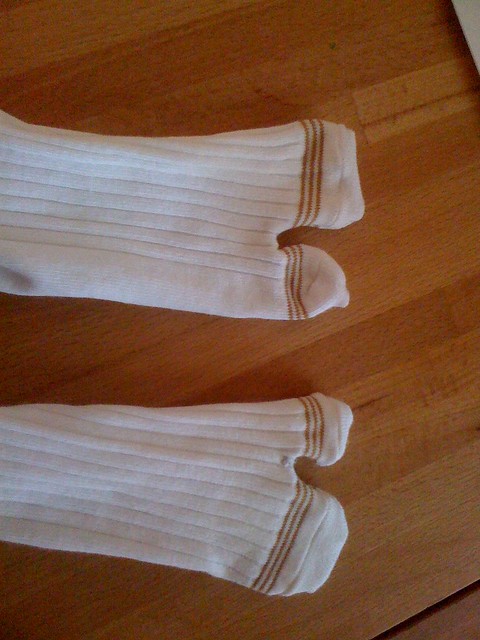
How to make Tabi (split-toed) socks from regular socks
Kivi needed a pair of tabi socks to wear with her flip-flops for her Geisha costume on Halloween. Good thing I found this:
eHow Tutorial: Coverting socks to tabi socks
Here's how mine turned out. I'm not thrilled with the gold stripes across the toes, but for the costume, I'm not going to worry too much about it.
eHow Tutorial: Coverting socks to tabi socks
Here's how mine turned out. I'm not thrilled with the gold stripes across the toes, but for the costume, I'm not going to worry too much about it.
Friday, October 22, 2010
Fabric remant use: Matching trick-or-treat bag
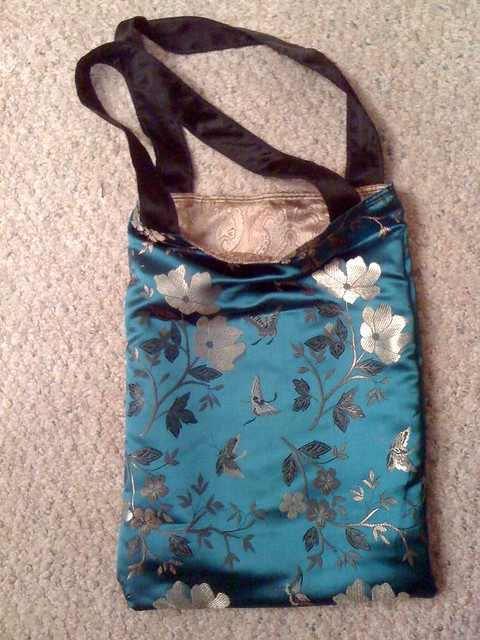
Using leftover fabric from Kivi's costume, I made her a matching trick-or-treat bag. It's a little narrower and shorter than a paper grocery bag, and much shallower front-to-back. It's fully reversible, and it took maybe an hour.
Fun stuff. My daughter's first comment was "I can use it as a pillow bag while I'm waiting for Halloween!"
Thursday, October 21, 2010
Repairing a parasol (AKA Halloween prop)

Kivi bought a parasol with her own money at the Minnesota State Fair this year, and not long after she brought it home, she and a friend were playing with it ... and alas something happened.
An accident and the cheap umbrella was missing some lacing that held it together, and one spar was split. I repaired the spar with clear tape (you can see it at about the 2:00 position), and then threaded a small tapestry needle and tied some rayon thread (the thinner thread in the upper right) and re-laced it. I also replaced the green thread circling the crown (it's kind of tan in the picture) with tan upholstery thread.
So now, it's ready for Halloween and her Geisha costume.
Wednesday, October 20, 2010
Book Highlight - Sew Eco
"Sustainable sewing projects don't have to be scratchy hemp skirts and brown patchwork aprons - you could be making beautiful one-off pieces for yourself and your home from unique and unusual eco-friendly recycled or vintage fabrics. A whole new generation of savvy craftsters have been dusting off old sewing machines and revving them up, but they don't want to make just any old thing. This book will guide readers through a series of stylish sewing projects with a focus on sourcing and using sustainable fabrics. The projects teach different aspects of sewing, starting with making cushions from recycled shirts, old jumpers, vintage buttons and other materials, working through making simple skirts and bags, to using leather applique, working with vintage lace and peace silk, using organic fabrics for scarves and shawls and even 'upcycling' an old suede skirt or hat into something beautiful and unique. "
Tuesday, October 19, 2010
Cool reusable shopping bags - using a plastic shopping bag as a pattern
Take a look at this: Someone made a reusable grocery bag by using a plastic shopping bag as their pattern.
http://www.craftster.org/forum/index.php?topic=177482.0
http://www.craftster.org/forum/index.php?topic=177482.0
Monday, October 18, 2010
Cheap (sort of) fleece sweatpants

In general, you can't save money by sewing. Nearly everything is cheaper to buy ready-made than to make it, especially if you shop at big box stores like Target.
Every once in awhile, I stumble across a sale, however, that makes it possible to make something at a better price than if you buy it.
A couple of years ago, I scored some cheap white polar fleece at a warehouse liquidation sale (they were moving locations) for only $1/yard (compare that to the regular price at JoAnne's, which ranges from $9-$12/yard). It's been sitting in my closet, waiting for a project.
Well, just such a project came up a couple of weeks ago.
I had just made a pair of white fleece pants for my daughter to wear under her Halloween costume. My 16-year-old stepson took one look at them and said "I want a pair." Given that it was the first time my stepson had actually asked for something, I jumped on the chance.
The pattern was a $1 (on sale) Simplicity pattern (5362 for those who are interested) that I had bought on spec at some point. I went out and bought zippers for the pockets and elastic for the waist. The thread used was so inexpensive that it was almost free (serger thread is comparatively inexpensive comes in very big quantities, and it doesn't take much for a simple project like this). I don't remember the price of the elastic that I used in the ankles, as I bought it several years ago, so I'll have to guess on that. It's nearly impossible for me to quantify the paper used to trace the pattern as we got it for free, so I'm not going to count it.
So the breakdown goes like this:
$1.00 for pattern
$2.50 for 2.5 yards of fabric
$2.60 for zippers
$2.60 for 2 packages of elastic
$0.25 for thread
$0.50 for 2/3 yard of elastic
$9.45 Materials Total
Activewear pants for men at Target start at about $10, but most run around $14-20 depending. Now that said, I spent probably 10 hours on the pants. That includes tracing the pattern which is somewhat time consuming (and wouldn't have to be repeated if I make them again for him). It also counts the 2+ hours I spent figuring out the !@#$% coverstitch capabilities on my serger (there was NOTHING in the manual explaining how you start and stop, which is VERY different than when you are simply serging, and messes things up if you try and use it like a serger).
Considering that I won't ever have to worry about learning the coverstitching again, let's knock off 2 hours from the total. That brings us down to 8 hours. Let's also spread the pattern tracing times over perhaps 3 pairs of those pants, so that brings us down to 7 hours. I also think I'll be MUCH faster the next time I make them, as there are other things I understand how to do now, so I think we can bring the time down to perhaps 5 hours. If I pay myself $20/hour, then it means that the true cost of the sweats are $109.45. Even if I only pay myself $10/hour, they'd cost $59.45.
Another consideration is that I couldn't make another pair that cheaply, as I usually buy comparable quality (aka not particularly high quality) inexpensive fleece from JoAnne's for about $5/yard on sale. But if you wanted real, high quality fleece like the kind you'd get on clothing from L.L. Bean, you could expect to spend closer to $20/yard at the consumer level (few of us are prepared to buy in wholesale quantities). What this means is that the materials cost would range from $19 - $57.
Huh.... so much for being cheap sweat pants. Makes you wonder about how Target and Walmart can offer such things so cheaply. Big sewing factories can certainly turn out pants far more cheaply and quickly than I can due to streamlined processes, and outsourcing to foreign countries where labor costs are far cheaper and less regulated also lowers costs substantially.
But, you should consider what your clothing is really worth, and where it comes from. I'm absolutely not telling you to quit buying your clothing from discount department stores (I'm not gonna stop, so it would be hypocritical for me to tell you to do so). But, knowing the true value of your clothing is something to keep in mind. Some person, somewhere, made it so that you wouldn't have to.
My recommendation? If you can afford to do so, try to buy your clothing locally. If that's not really feasible, then at least try to buy clothing made in your own country, where you can more easily find out if the labor and industrial waste practices are ethical, AND less fuel will be spent getting the clothing to you. And finally, buy higher quality clothing, but less of it, and then make it last.
Friday, October 15, 2010
Recreating a Victorian bat costume
Evadress is a woman who specializes in re-creating vintage patterns. She finds a picture, then creates multi-sized patterns so that you can make them too.
The coolest one though is a bat costume from 1887. It's breathtaking. I don't even know how to do many of the techniques that were used. But, it's very, very cool. There are a few more pics here.
The coolest one though is a bat costume from 1887. It's breathtaking. I don't even know how to do many of the techniques that were used. But, it's very, very cool. There are a few more pics here.
Tuesday, October 12, 2010
Philly Zoo Dress Rehab
So what do you do when a favorite dress gets a little too short?

I bought this dress for my daughter at the Philadelphia Zoo when she was 2 years old. There was no size listed on the tag, but it literally came down to her ankles. I liked it so much that I bought it for her anyway, but put it away until she was 4, and then she wore it all the time.
Until she was 7, when it had gotten so short, it barely covered her butt. Still fit around her OK, though. (Ankles to butt... how did that happen? It was like Kivi grew or something)
There was also a hole in the front, a few inches above the hem. Kivi still liked the dress and wanted to keep wearing it, despite the crazily short length.
So, I attacked the hem with a seam ripper, and let it down. Periwinkle is an amazingly difficult color to match, but Kivi and I found a batik that worked OK. I made a ruffle and attached it to the bottom of the dress:

I covered the hole with a matching patch, which gave it a nice deliberate look. Here's a closeup of the new work:
 I actually like it that the old stitching, dye colors, and fold lines are still visible. They add texture and interest, and tell a story.
I bought this dress for my daughter at the Philadelphia Zoo when she was 2 years old. There was no size listed on the tag, but it literally came down to her ankles. I liked it so much that I bought it for her anyway, but put it away until she was 4, and then she wore it all the time.
Until she was 7, when it had gotten so short, it barely covered her butt. Still fit around her OK, though. (Ankles to butt... how did that happen? It was like Kivi grew or something)
There was also a hole in the front, a few inches above the hem. Kivi still liked the dress and wanted to keep wearing it, despite the crazily short length.
So, I attacked the hem with a seam ripper, and let it down. Periwinkle is an amazingly difficult color to match, but Kivi and I found a batik that worked OK. I made a ruffle and attached it to the bottom of the dress:
I covered the hole with a matching patch, which gave it a nice deliberate look. Here's a closeup of the new work:
I actually like it that the old stitching, dye colors, and fold lines are still visible. They add texture and interest, and tell a story.
Monday, October 11, 2010
Halloween 2010 Sneak Peak
Shhh... want to see Kivi's Halloween costume just a bit early?
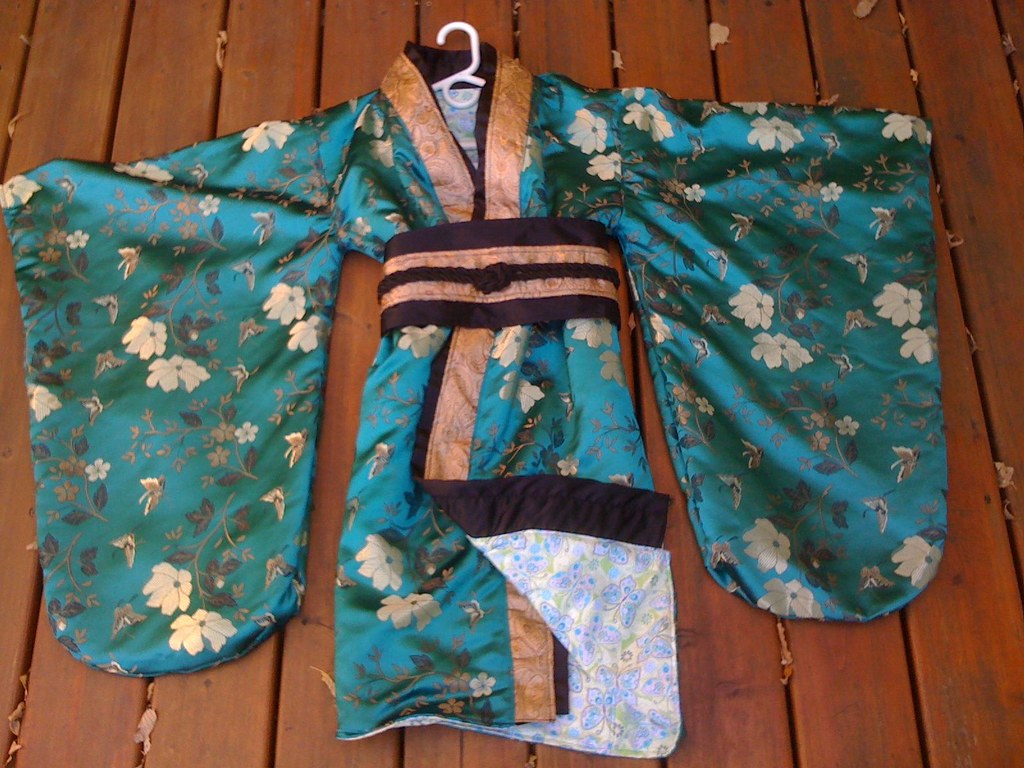 Brocade on the outside, lined with a butterfly flannel print. It's quite warm.
Here's a closeup of the obi. Sewing that cord on was a pain in the ass.
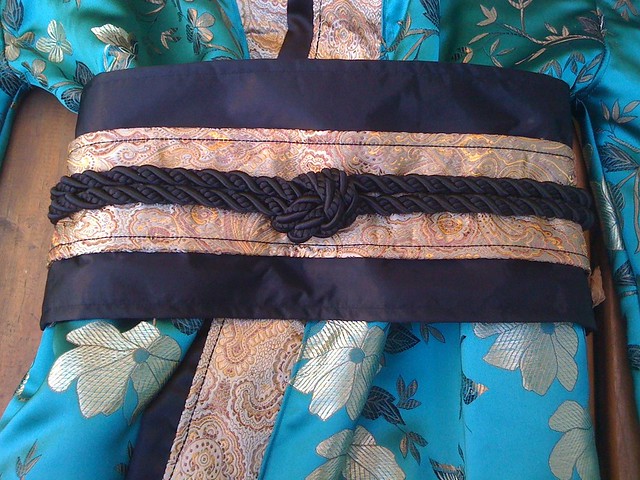
Brocade on the outside, lined with a butterfly flannel print. It's quite warm.Here's a closeup of the obi. Sewing that cord on was a pain in the ass.
Sunday, October 10, 2010
Greenest use of a sewing machine - kinda, well, boring
I think that mending clothing and other textiles has got to be the greenest use of my sewing machine. It's extends the life of clothing that we already have, thereby preventing the need to buy new or even used clothing.
But... I just wish mending were more fun. It's really kind of boring.
I vastly prefer to make new things, be it napkins, clothing, or matching couch pillows. Sometimes when a mending job is challenging, where I have to think through just how to repair the item - that makes it a little more interesting.
Ah well, before I sound too doomy and gloomy - I have to brag that by repairing my husband's jeans, that I've saved the household literally hundreds of dollars at this point, and in fact, the savings has been great enough that it virtually paid for my sewing machine. So, there are indeed rewards, just not interesting ones. ;-)
Saturday, October 9, 2010
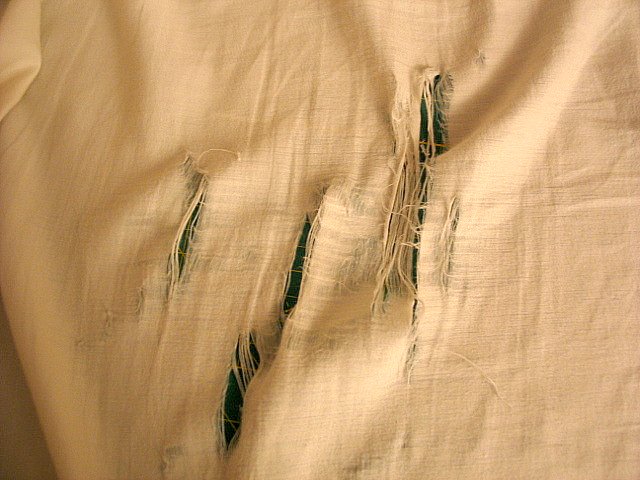
Holey fitted sheets, Batman! (...part 2)
Ok, so I've got a sheet (8 years old or so) that has a big shredded spot. . . . So I mended it.
Here's the hole:
I read up on different methods of fixing sheets, and here's what I did:
I ended up cutting 12" square patches (one for each side of the fabric, because the area needing repair is totally shredded) out of an old cotton sheet that has even more holes in it, that I've saved for just this sort of thing. I then cut an 11.5" square piece of fusible web (think of it as big sheets of double-stick tape for fabric, except that it's permanent, and bonds with the fabric). I bonded one side to one of my patches, then folded over 1/4" of fabric and bonded that to the back side of the fusible web. I now had an iron-on-patch.
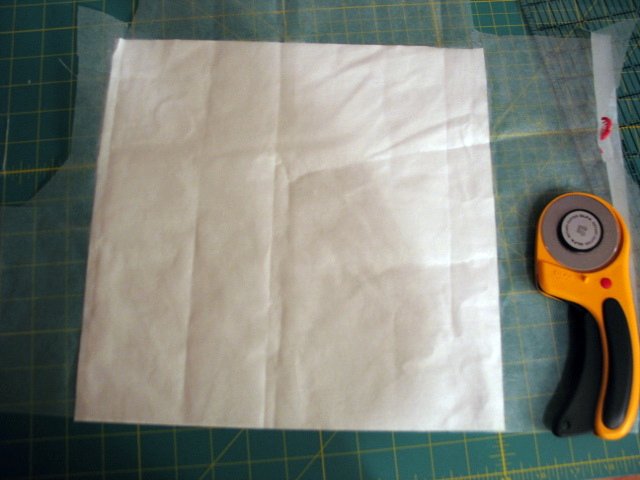
Hint: cut diagonal triangles off each corner so that when you fold it over, it forms a mitered corner. This reduces bulk at the corners.


I then cut the corners off the second patch and folded the edges of that in by 1/4" and then pressed the heck out of it. I then positioned the iron-on patch with the fusible side up on my ironing board. I then placed hole, top side down, centered on top of the patch. I then placed the second patch over the hole, trying to get the edges as even as possible with the other patch. I then used a wash-out fabric glue stick to hold the edges down, so it wouldn't shift while I was stitching it.
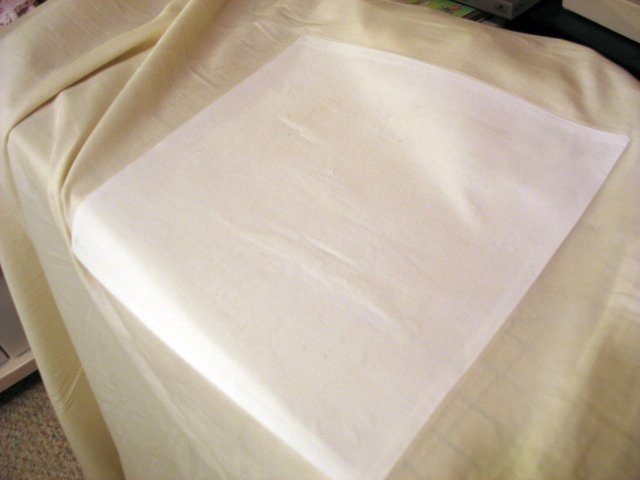
Then I ironed the heck out of it, fusing the web to the fabrics.
Next step - take it to the sewing machine. I stitched from the top side, as close to the edge of the patch as possible (trying to minimize the amount of "edge" that can catch on toenails or the like). I flipped it over, and found that I'd missed the edge of the lower patch alone one side, so I stitched a second row of stitching a couple of millimeters inside the first row of stitching.
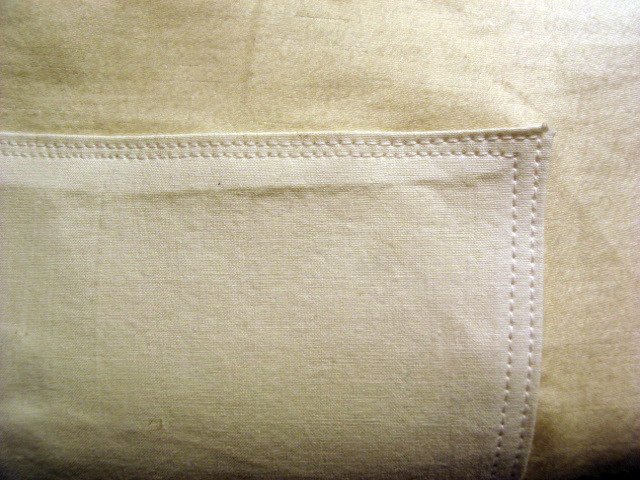
Voila: I end up with this. One thing I would do differently next time is round the corners - less likely to catch the corners on stuff, and I think it would be smoother.
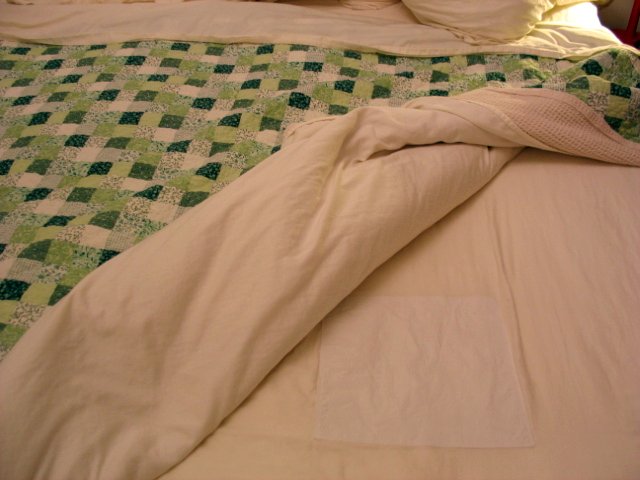
The sheet has been in nearly constant use for 8 years. It's a really high-quality cotton, and king-sized sheets are expensive. But... the fabric is pretty threadbare in places. I think I've probably only gained a few months of use, or perhaps a year or so. But, better than buying a new one, at least for now.
Edit: I slept on the patch last night, and while it's a little stiff, it matters not at all down near my feet and lower legs as that is. If I try to find it with my feet, I can, but otherwise it's completely fine.
Here's the hole:
I read up on different methods of fixing sheets, and here's what I did:
I ended up cutting 12" square patches (one for each side of the fabric, because the area needing repair is totally shredded) out of an old cotton sheet that has even more holes in it, that I've saved for just this sort of thing. I then cut an 11.5" square piece of fusible web (think of it as big sheets of double-stick tape for fabric, except that it's permanent, and bonds with the fabric). I bonded one side to one of my patches, then folded over 1/4" of fabric and bonded that to the back side of the fusible web. I now had an iron-on-patch.
Hint: cut diagonal triangles off each corner so that when you fold it over, it forms a mitered corner. This reduces bulk at the corners.
I then cut the corners off the second patch and folded the edges of that in by 1/4" and then pressed the heck out of it. I then positioned the iron-on patch with the fusible side up on my ironing board. I then placed hole, top side down, centered on top of the patch. I then placed the second patch over the hole, trying to get the edges as even as possible with the other patch. I then used a wash-out fabric glue stick to hold the edges down, so it wouldn't shift while I was stitching it.
Then I ironed the heck out of it, fusing the web to the fabrics.
Next step - take it to the sewing machine. I stitched from the top side, as close to the edge of the patch as possible (trying to minimize the amount of "edge" that can catch on toenails or the like). I flipped it over, and found that I'd missed the edge of the lower patch alone one side, so I stitched a second row of stitching a couple of millimeters inside the first row of stitching.
Voila: I end up with this. One thing I would do differently next time is round the corners - less likely to catch the corners on stuff, and I think it would be smoother.
The sheet has been in nearly constant use for 8 years. It's a really high-quality cotton, and king-sized sheets are expensive. But... the fabric is pretty threadbare in places. I think I've probably only gained a few months of use, or perhaps a year or so. But, better than buying a new one, at least for now.
Edit: I slept on the patch last night, and while it's a little stiff, it matters not at all down near my feet and lower legs as that is. If I try to find it with my feet, I can, but otherwise it's completely fine.
Friday, October 8, 2010
Holey fitted sheets, Batman!
Ok, so I firmly believe that we should not be such a throw-away culture. Eight years ago, my husband and I upgraded to a king-sized bed, and would you believe that buying decent-quality bedding for it (2 sets of super soft all-cotton sheets and pillowcases, cotton thermal blanket, cotton quilt, and a primaloft comforter) cost almost as much as the bed itself?
So now, nearly a decade later, one of the fitted sheets is starting to wear out:
I'm not ready to turn the sheet into muslin material for sewing, or for a ghost costume for Halloween. It's just got this one (large) hole near our feet, but is otherwise in good condition. So, I'm going to patch the darned thing.
Yeah, I'm worried that it'll be uncomfortable, or that it's an exercise in futility, that the shredded area will grow. But it's worth a try, right? I'll keep you updated.
60 Napkins

These are the napkins I've made for my family. Most are, well, sloppy (though usable!), made as I was experimenting with different edge finishes and fabrics. Some are "seconds" that were usable screwups as I was (attempting) to make some for sale.
My husband, daughter, and I each picked a few fabrics. I picked a few others (mostly ones with skulls) on behalf of my stepsonkiddo.
They are fun. We grab 4 napkins, and let the kids pick the napkins they want to use, and it brightens the meal just a little.
Thursday, October 7, 2010
Turning an old T-shirt into briefs
Here's another article I wrote a couple of years ago, about turning an old T-shirt into a pair of underwear:
http://thingsweeks.blogspot.com/2008/10/recycling-old-t-shirts-into-underwear.html
http://thingsweeks.blogspot.com/2008/10/recycling-old-t-shirts-into-underwear.html
Wednesday, October 6, 2010
Well, yes. Linen DOES wrinkle. And your point is?

This is a freshly-laundered linen napkin. And no, don't bother ironing it - unless you are hosting a business dinner or something. It's a hassle, (don't you have other things you'd rather be doing??) it contributes to unnecessary electricity usage, and they are just going to get wrinkled all over again.
They are actually softer left natural. And, I think they are actually prettier this way. I'm weird that way, though.
Tuesday, October 5, 2010
Recycled denim napkins
One of the greenest options for napkins, is to used recycled fabric. Textile-production is generally NOT an earth-friendly process, and the production of cloth - while it doesn't contribute to deforestation, DOES have a pretty hefty carbon footprint.
So, one of my favorite napkin materials is used denim. The ones in the photos below came from a pair of torn-up and outgrown jeans belonging to my stepkiddo.

As most people can attest, jeans make an EXCELLENT place to wipe your hands (sigh...). So it stands to reason that they'd make good napkins, too. And when they wear out as napkins, they make excellent cleaning rags.
Monday, October 4, 2010
Life with cloth napkins and pet fur
So, how do you keep cat/dog/pet fur off your cloth napkins?
Weeeeeellllll....you don't. Not really. See the cat hair on the black background fabric below ? (And ironically, that's an actual cloth napkin, freshly laundered.)

But, there are things things that you can do to minimize it.
1. Laundry baskets: My cats love 'em. Laundry baskets with freshly laundered clothing? Forget it - they emit a siren call to my cats who make a beeline to ANY basket full of clean laundry. So don't put the clean napkins in your laundry baskets, well, ever.
2. Laundry hampers: My cats love those, too. Not as much perhaps, because they are taller, but once they get full of dirty clothes, I find cats in them regularly. Having cat hair on dirty clothes isn't as big an issue, but the washer and dryer don't remove all cat fur from our clothes, alas. So my dirty napkins don't go there, either.
3. Which brings us to where to store your napkins. When they are dirty, they go into their own little (ie, too small for the cats to curl up in) hamper in the kitchen. It's nestled into a corner behind the buffet, and is a little black mesh trash can:

4. When I'm running low on napkins, I take the dirty ones to the laundry room, and add them to the next colorful load of laundry (which is why this isn't a perfect system - pet fur cross-contamination! But, I would rather be green, so I deal with it).
5. Clean napkins go directly from the dryer into a stack:
 5. And from the stack, they go into a napkin holder of some sort:

Not ideal, but it works reasonably well.
Weeeeeellllll....you don't. Not really. See the cat hair on the black background fabric below ? (And ironically, that's an actual cloth napkin, freshly laundered.)

But, there are things things that you can do to minimize it.
1. Laundry baskets: My cats love 'em. Laundry baskets with freshly laundered clothing? Forget it - they emit a siren call to my cats who make a beeline to ANY basket full of clean laundry. So don't put the clean napkins in your laundry baskets, well, ever.
2. Laundry hampers: My cats love those, too. Not as much perhaps, because they are taller, but once they get full of dirty clothes, I find cats in them regularly. Having cat hair on dirty clothes isn't as big an issue, but the washer and dryer don't remove all cat fur from our clothes, alas. So my dirty napkins don't go there, either.
3. Which brings us to where to store your napkins. When they are dirty, they go into their own little (ie, too small for the cats to curl up in) hamper in the kitchen. It's nestled into a corner behind the buffet, and is a little black mesh trash can:

4. When I'm running low on napkins, I take the dirty ones to the laundry room, and add them to the next colorful load of laundry (which is why this isn't a perfect system - pet fur cross-contamination! But, I would rather be green, so I deal with it).
5. Clean napkins go directly from the dryer into a stack:
 5. And from the stack, they go into a napkin holder of some sort:
Not ideal, but it works reasonably well.
Sunday, October 3, 2010
Finding eco-friendly clothing ...
... is harder than you think. But it's doable.
Found a few tips in this article entitled Who Says Your Clothes Are Eco-Friendly? That Depends. It's worth reading.
Found a few tips in this article entitled Who Says Your Clothes Are Eco-Friendly? That Depends. It's worth reading.
Book Highlight - Sew U Home Stretch
I'm reading Wendy Mullins' book Sew U Home stretch:
So far, it's a surprisingly interesting read. I mean, sewing books can be notoriously ... well, boring. Often they are written as dry how-to articles, and it's like reading an encyclopedia entry, you read it just to find out how to do something. But, it's not like it's actually interesting.
This one is written in a conversational style, and that's rather neat.
Friday, October 1, 2010
Linen napkins
I haven't located a source of organic linen that I'm happy with (yet). So, these are regular linen, which is still more eco-friendly than cotton. Flax (the plant that is turned into linen) requires less water and pesticides.

I have to say that it was HARD getting the edge to roll neatly. Or is that because I'm not terribly used to sewing with a serger yet?
Anyway, check out the different sizes available in my Etsy store.

I have to say that it was HARD getting the edge to roll neatly. Or is that because I'm not terribly used to sewing with a serger yet?
Anyway, check out the different sizes available in my Etsy store.
Kivi's 2010 Halloween Costume
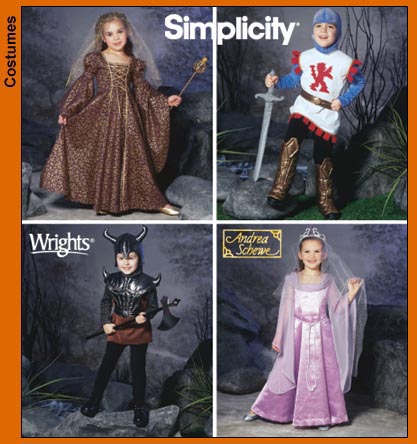
Ok, so I know this is TOTALLY not a green topic, but I'm making McCalls M4953 Geisha/Kimono costume for Kivi this year:

I'm making the version on the right. Instead of gold, the fabric is a deep turquoise brocade with gold and black butterflies and flowers. The black parts of the costume (wide obi band, narrow trim along the neckline, and the black cord) will be black on our version too. And the black and white contrast band along the neckline will be a gold/bronze tapestry brocade. And the lining will be a blue, green, and yellow butterfly flannel print. (Hey, it's Minnesota. It's cold at Halloween!).
One point of contention is that Kivi wants me to dye her hair black for Halloween. I've absolutely refused. Even the "temporary" hair color will darken her hair for several weeks. I just can't cover up her naturally red hair color. The kid has the loveliest hair in the world, and to cover it up is just wrong. (Sigh....) If I can find some cheap spray on color that will wash right out, I might be persuaded to do that.
Wednesday, September 29, 2010
Book Highlight - Decorative Napkin Folding For Beginners
This isn't my thing, but I thought I'd highlight napkin-folding books occasionally. Readers? If you have this book - is it any good?
Learning to work faster
Today I tried a sewing technique that I've read about, but usually discounted, as I didn't actually believe it would help.
It's called chain stitching.
The idea is simple. You have a stack of items to be sewn sitting ready. As soon as you finish the first seam, you grab - without cutting the first item off the machine - the next item and sew it next. Repeat until all items are sewn. Now you have a series of items connected by a chain of threads.
In my case, when I had sewn the last napkin, I cut the chain off the serger, and flipped the whole thing around, and sewed the edges of the opposite side without cutting - it made a ladder of napkins. I cut them apart and then sewed the two adjacent sides, making a new ladder.
I saved 30 percent off the individual napkin sewing time. THIRTY PERCENT. I figured I'd save a few seconds. I had no idea that it would be THAT much better.
I've read that experienced seamsters do it for garment sewing. I'm going to have to try it.
My first napkins that are (ahem) good enough to sell
I made some cute Halloween Napkins. They aren't as eco-friendly as they could be (not made of specialty eco-fabrics), but are lots of fun.
 I made 4 12-inch dinner napkins, and 12 9-inch napkins. Anyone having a Halloween party? You could use these as your favors - revelers can take them home and reuse them. Or keep them, or whatever. You can get them at my Etsy store.
 I made 4 12-inch dinner napkins, and 12 9-inch napkins. Anyone having a Halloween party? You could use these as your favors - revelers can take them home and reuse them. Or keep them, or whatever. You can get them at my Etsy store.
How to use cloth napkins, and have them not be a hassle from hell
Using cloth napkins was actually my husband's idea.
At first, I was annoyed. ("Honey, I've got this great idea, but I want YOU to implement it.") He doesn't know how to sew, and I do about 90% of the laundry.
But then I got to thinking. It was a good way for us to cut back on what we send to the landfill, but in my experience, cloth napkins are a hassle.
You have to wash them.
You have to fold them.
You have to iron them.
You have to remember where they are.
You have to pick cat hair off them.
You have to put them away.
I got to thinking about how to make them NOT a hassle (and that's a very big deal in my household).
- Folding (as in don't): What if we made them a) square, and b) small enough that they could be stacked flat without folding? I could go with a 6" square (the size of paper napkins when they are still folded). Chris is the only one who actually unfolds his paper napkin, so I asked him what the smallest workable size would be. He agreed that 9" square would do. Check.
- Ironing them (nope): I hate ironing. I don't mind it as part of my sewing, but regular ironing? I don't iron. Chris takes his shirts to the cleaners to be pressed (and mostly doesn't wear shirts that require pressing). That got me thinking. Why DO they need to be ironed? Napkins are a utilitarian item used for wiping food off your mouth and fingers (and chest, and lap, and the floor...). So what if they are wrinkly? Check.
- Cat hair and organization skills (lack of): My cats LOVE my laundry baskets. What cats don't? I don't care so much if there's a few cat hairs on my jeans, but on napkins? Where I'm going to be wiping my mouth? Turkish Angora fur in my mouth? Not happening. So, how to keep them off the napkins? Easy. Don't put them in laundry baskets where the cats will be. I bought a basket to hold the clean napkins, and a small, cheap black mesh trash basket to hold the soiled napkins. The napkin holder sits on the table, and the "hamper" sits in the corner behind the buffet. Both are too small for our cats to curl up in. Check.
- Laundering (No getting around this one): When the napkins in the holder are getting low, I collect the ones in the wastebasket (er, hamper) and take them to the laundry room, and add them to the next mixed-color load. When they are dry, I take them out and make a stack, smoothing them out slightly as I go. I then do NOT leave them in the basket where my kitties will get to them, and put them in the napkin holder, under the remaining clean ones.
- Having enough napkins (we need lots): In order for this to work for us, I knew we needed to have a LOT of cloth napkins. Enough for all 4 of us, for at least 2 meals per day, for at least a week. That's 42 napkins. Preferably we'd have more. I knew that if we had just a handful, that we'd use them up, and they'd not migrate back to the napkin holder for quite awhile. For anyone more organized, or even slightly better at housekeeping, having this many might not be needed. Check.
So, just how green ARE cloth napkins?
Are cloth napkins a more green choice for the environment, than paper napkins?
It depends.
Hands down, paper napkins, especially ones that are unbleached and made from recycled fibers, take MUCH less energy to manufacture. Even the white ones don't take much energy (but the bleaching ... eek!). There's really no comparison in energy use because textile manufacturing is pretty energy and water-intensive. And added to the energy consumption of cloth, is regular laundering.
Then there's the landfill issue. Rotting paper napkins produce greenhouse gasses, and contribute to various other landfill problems. Cloth is much less of a environmental load in the landfills. it's there, certainly, but it gets recycled, sent to goodwill, sold in garage sales and the like, and paper napkins never do.
So, which is better?
Well, cloth, but only a little in most cases. There are things you can do to make your napkins more environmentally friendly:
For more reading:
http://www.suite101.com/content/cloth-napkins-versus-paper-napkins-a150589
http://www.treehugger.com/files/2009/07/are-paper-napkins-more-environmentally-friendly.php
http://articles.sfgate.com/2008-08-23/home-and-garden/17125404_1_napkins-water-shortage-cloth
http://www.mnn.com/lifestyle/responsible-living/stories/paper-vs-cloth-what-are-the-greenest-options
http://www.growingagreenfamily.com/ditch-paper-napkins-and-save-almost-nothing-huh/
It depends.
Hands down, paper napkins, especially ones that are unbleached and made from recycled fibers, take MUCH less energy to manufacture. Even the white ones don't take much energy (but the bleaching ... eek!). There's really no comparison in energy use because textile manufacturing is pretty energy and water-intensive. And added to the energy consumption of cloth, is regular laundering.
Then there's the landfill issue. Rotting paper napkins produce greenhouse gasses, and contribute to various other landfill problems. Cloth is much less of a environmental load in the landfills. it's there, certainly, but it gets recycled, sent to goodwill, sold in garage sales and the like, and paper napkins never do.
So, which is better?
Well, cloth, but only a little in most cases. There are things you can do to make your napkins more environmentally friendly:
- Use recycled cloth. Turn old (and especially torn, unrepairable, or unwearable) clothes into napkins.
- Choose environmentally-friendly fabrics. Linen, while more expensive, uses much less water and pesticides than other fabrics.
- Go organic with cotton. Cotton uses a lot of pesticides and a lot of water.
- Use your cloth napkins until they are downright threadbare. And then use them as rags until they fall apart.
- Go wrinkly and don't iron your napkins! Who cares if they are a little wrinkled? You are just going to be getting them dirty again. Special occasions and holidays are one thing, but for everyday use, let 'em wrinkle.
- Don't wash them each and every time, if you can help it. Use napkin rings with your family's names on it, and keep using the napkin until it's actually dirty.
- Don't wash the napkins in a load by themselves. That's an AMAZING waste of water. (It takes something like 200+ napkins to make a single load). Just throw them in with your other laundry that you'd be doing anyway.
- Wash in cold water whenever possible (and that goes for all your laundry, and not just napkins).
- Don't overdry your laundry and napkins (it's really fine for your clothes to be ever-so-slightly damp - fold everything anyway. It'll dry by the time you wear it, trust me. Besides, it cuts down on static). Better yet, hang as much stuff dry as possible.
For more reading:
http://www.suite101.com/content/cloth-napkins-versus-paper-napkins-a150589
http://www.treehugger.com/files/2009/07/are-paper-napkins-more-environmentally-friendly.php
http://articles.sfgate.com/2008-08-23/home-and-garden/17125404_1_napkins-water-shortage-cloth
http://www.mnn.com/lifestyle/responsible-living/stories/paper-vs-cloth-what-are-the-greenest-options
http://www.growingagreenfamily.com/ditch-paper-napkins-and-save-almost-nothing-huh/
Saturday, September 18, 2010
Serger ... wow!
I got one of these: 
It's pretty amazing how much faster a serger can sew, versus a traditional sewing machine. I can finish a napkin in about a minute and a half, and it's FAR more professional looking than anything I've made on my sewing machine. Wow. I LOVE it.
It's pretty amazing how much faster a serger can sew, versus a traditional sewing machine. I can finish a napkin in about a minute and a half, and it's FAR more professional looking than anything I've made on my sewing machine. Wow. I LOVE it.
Wednesday, September 15, 2010
There's a learning curve....
I figured out a way to zig-zag the edges with my sewing machine to fake a rolled hem done on a serger, and I think it took me 17 napkins to get one I was happy with.
But... after washing the faked rolled hems look sloppy. They'll last OK, but it's obvious that it's not professional.
So now I'm trying other types of edges until I can get a serger.
But... after washing the faked rolled hems look sloppy. They'll last OK, but it's obvious that it's not professional.
So now I'm trying other types of edges until I can get a serger.
Tuesday, September 14, 2010
Mitered corners?
I found this tutorial:
http://www.skiptomylou.org/2009/04/20/make-your-own-cloth-napkins/
I wanted to learn how to make mitered corners, and they are harder than it seems.
http://www.skiptomylou.org/2009/04/20/make-your-own-cloth-napkins/
I wanted to learn how to make mitered corners, and they are harder than it seems.
Subscribe to:
Posts (Atom)